Monday, 23 September 2013

From New York to Paris: FW beauty looks

Gucci, Rodarte and Jason Wu SS14


With international Fashion Weeks wrapping up, I thought I would share some of my favourite beauty looks from New York and Paris.

I adore the entire look James Kaliardos (for NARS) created at Rodarte's Spring/Summer '14 Collection. Inspired by an LA 80's rocker style, the graphic eyeliner and brushed up brows is effortlessly cool. Key products for this look included NARS Larger Than Life eyeliner in Via Veneto and NARS Oural Brow Gel.


Rodarte SS14

The Zebra-print Hair-pieces were a bit fabulous too!


Jason Wu and Gucci had similar, stunning bronze eye-makeup looks for their collections this season.

At Jason Wu, Diane Kendal (for Lanôme) created the statement eye with Le Crayon Khôl in Black Coffee smudged in the creases. A brown shadow was pressed into the lid before adding bronze-gold glitter, finishing the look with plenty of mascara.


Jason Wu SS14


 Pat McGrath described her beauty look for Gucci as "Sporty, cool, luxurious - but still sexy". And I really couldn't think of a more perfect description. I just love the golden-bronze, statement eye of this look, the fresh skin and clear balm on the lips; all encompassing the athleticism of the perfect sporty-luxe look.


I really love both of these takes on a bronze/brown statement eye. A great eye-shadow palette to achieve the look yourself is Urban Decay's NAKED palette (it has a great selection of bronzy-brown shades) or you could handpick your own golden brown shadows from Inglot; the pigment of their shadows is amazing. Team a bronze statement eye with a neutral lip and clean skin and you've got the look down pat.


Friday, 20 September 2013

Let's be Frank // Product Review

I'm a sucker for products marketed through instagram. Which explains how I wound up ordering Frank online.


Who is Frank?


What is Frank, would be a more accurate question. Frank is a coffee scrub that claims to target cellulite, stretch marks, dry and tired skin through it's essential oils, minerals and special coffee blend.


Basically speaking, it's an exfoliating body scrub.

With 44,662 followers on instagram and thousands of girls hashtagging semi-naked photos of themselves covered in coffee I had to test this scrub out for myself. (For only $14.95, there's really not a lot to lose).

Firstly, this stuff smells un-freaking-believably good. I'm not a huge coffee drinker myself but it took more than a mere thought to not go right ahead and eat it (fyi, it does say on the packet NOT to...I checked).

To get down to the nitty gritty of it, this stuff is kinda dirty. 


For a bathroom on the lighter side, you might want to be particular about keeping this is an easily rinsable area. 

You definitely don't want to use this after a faketan because essentially it is an exfoliant which is going to scrub it right off. However, although it suggests it could be used to scrub before a fresh application of faketan, I wouldn't personally recommend this, at least not on the same day. The oils in Frank are quite intense which I believe would affect a faketan absorbing into your skin evenly. (Just like it is not recommended you moisturise prior to getting a spray tan.)

It would be great to exfoliate a patchy tan off  though and I would highly recommend it as a great exfoliator for dry skin. 


I'm a little sceptical on any claim to improve cellulite or the appearance of stretchmarks but all in all I did enjoy this scrub and my skin felt deliciously smooth after using it. The coffee smell faded nicely without affecting any fragrances I used afterwards.


You can purchase and find out more about this product through the Frank Body website frankbody.com, facebook page: facebook/frankskincare or check out their instagram @frank_bod.

Thursday, 19 September 2013

Brow Loving

I have a small major obsession with brows. On myself I prefer them full and slightly polished, but I can appreciate the wild and woolly along with the sparse and barely-there just as much.

Some of my All-Time Favourite Brows

 Camilla Belle 
Isabel Lucas
 Audrey Hepburn
Grace Kelly
 Oh hey, there cutie!
Not forgetting of course, Former Australian PM and Brow King, John Howard.
Going against what most brow experts will tell you about brows, I don't believe there should be too many strict rules when it comes to maintaining your own little forehead-monsters.Therefore I am presenting a guide only to brows and an insight into how I polish my own two furry friends.


Given that I am in no way qualified in the area of brow hair removal (aside from my own DIY tweezing), I won't tell you how to pluck, wax, thread or even shave your eyebrows. Generally speaking a tidied, natural brow shape is most flattering. Try to avoid over-plucking or attempting to create an unnatural shape.


A Guide to Filling Your Brows

If in doubt, go lighter in choosing a colour to fill your brows with. Even the darkest of brunettes and those with the blackest of black hair should be opting for a lighter brown pencil or powder.

My favourite quotation in relation to brows and something everyone should remember is "Your Eyebrows are Sisters not Twins".
Don't stress yourself trying to create perfectly symmetrical eyebrows. You're more than likely not going to be sucessful and it really isn't natural anyway.

If I'm in a hurry I like to fill my brows with a pencil (Rimmel's eyebrow pencil in Hazel 002) but to achieve the best finish I opt for a powder. There are plenty of Brow specific powders on the market that I am desperate to try (Anastasia's 5-element brow kit and Bobbi Brown's brow kit to name a couple), but for now I'm actually using the matte eye shadows from my Urban Decay Naked Palette, in colours "Naked" and "Buck". Avoid any powders with a mettalic or slight shimmer finish.


I am particularly loving a gradient brow at the moment i.e. the head of the brow staying light, with the colour deepening along the body and tail. I like the head of my brow neat but not too dark or it can come off a little harsh and unnatural.


You HAVE to check out this massive babe's instagram @grgctts. She's completely flawless in her make-up application and constantly features on Illamasqua's social media sites.


I apply my powders using a flat firm liner brush, typically used for a liquid or gel eyeliner (currently Kirkland Signature's Liner brush) filling in the body of my brow in the medium "Buck" colour and the head of the brow in the lighter "Naked" colour. I deepen the arch and tail with a darker brown pencil like Essence Eyebrow pencil in 02 Brown.

To sharpen the shape I use Napoleon Perdis brush BR 8 with a concealer under and over the brow lines I have created. 


To finish I'll brush through my brows with a clean mascara wand and I'm good to go.


There are a ton of great youtube tutorials you can use as a reference for achieving a gradient brow. Pala Foxxia's Gradient Eyebrow Makeup Tutorial was one in particular that I first referenced for myself.


My own brows before and after some brow-love.
What a difference a little facepaint can make. 
(Especially to the wild sister on the left, yikes!)

Tuesday, 17 September 2013

LFW: Looks I'm Loving from London

Designers, Antonio Beradi and House of Holland both adopted a strong red lip for their Spring 2014 Collections at London Fashion Week shows this week.


Antonio Beradi Spring LFW


House of Holland LFW
photo source: bellasuga.com.au

 I can't go past Rimmel's Lasting Finish Matte Lipstick by Kate Moss in #107 to recreate this look.


 I adore the matte finish of this lipstick without it being drying. The formula itself is a beautiful creamy texture and is intensely pigmented; you really don't need more than a swipe for a perfect opaque colour payoff. The rich berry-red shade will suit most skin tones and the colour lasts for at least 5 hours without reapplying.

I'm fairly certain I purchased my lipstick from Coles for around $10, therefore it won't cost you much to look like you've just stepped off the LFW runway.


Monday, 16 September 2013

LARA BINGLE X OYSTER MAG

Stoppp it. But really don't. This shoot with LB in Oyster magazine could not be more perfect. Who knew, Larz? Bloody flawless!


Adding Self-tanner and Nude lip to the shopping list as we speak.

Friday, 13 September 2013

How to Contour and Highlight Your Face

Kimmy K made this concept huge the moment she tweeted how makeup artist, Scott Barnes gets her camera ready back in May 2012. Unless you were blessed with the chiseled cheekbones of Angelina, Rosie Huntington-Whiteley or Cara Delevingne there's no harm in faking what yo mumma didn't give you with a highlighter, contour and blusher.
If you want to go extreme with your contouring like Kim, I have taken the liberty (and shameless selfies) to map out where to contour (the darker colour) and highlight (the lighter colour). This has been exaggerated in the images below as the amount of product I used for the photo would be a nightmare to blend, but you get the general idea.


To be honest, I wouldn't normally get this crazy with contouring. I mainly stick with my cheeks and occasionally the temple. I'll always highlight my brow bone and generally conceal my undereye with at least a shade lighter than my foundation. During a short course at Napoleon Perdis' Academy of Makeup I learned a great guide for achieving the perfect cheekbone contour. 


It's all about getting the right angle and knowing how far to take it.


1. THE ANGLE: Your contour should be from the top corner of your ear in line with the corner of your mouth.


2. THE LENGTH: Finish your contour in line with the contour angle and the bottom of where your nose finishes.


Your contour should not drag down any further than the end of your nose.


Exhibit A 


The contour needs to be the highlighted green section on Megan, most importantly you need to blend.
(Megan Gale for Loréal, featured in WHO magazine Sept 23, 2013, drawn on by yours truly)


I also drew on Ms Kardashian and Minka Kelly's perfect profiles (who were featured in last month's Cosmo magazine) to reiterate the idea:


The contour should be on the bold line of these images.


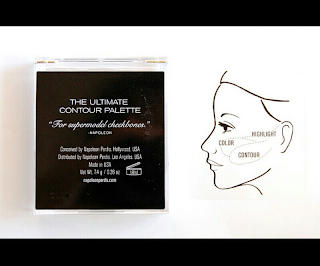
You can achieve a contour with either liquid, créme or powder. I usually find a powder easier to blend and it is important to ensure your blending is as seamless as possible; a subtle contour is more believable and flattering. My all time favourite, can't-live-without product to achieve the perfect contour and highlight is Napoleon Perdis' Ultimate contour palette.


It has literally everything you need to create model worthy cheekbones and even comes with it's own cute little guide to contouring. Retailing for $39 in Australia it has definitely taken a place as one of my top 3 favourite Napoleon Perdis products after having had the fortune to trial all of Napoleon's cosmetics at the academy.

As a guide go up to 4 shades darker than your foundation for any contouring colour and up to 2 shades lighter for highighting.


Contoured like a pro. Perfect. 

Thursday, 12 September 2013

Kate Spade 2014 NYFW

Could this be any cuter? 


Kate Spade's collaboration with Jouer Cosmetics for her Spring 2014 Collection at New York Fashion Week this year did not disappoint. Neil Scibelli, Brand Ambassdor for Jouer Cosmetics created this super pretty look with a gorgeous cat eye teamed with a flick of white on the inner corners and lower lashline. He kept it adorably girly with a glossy baby pink lip. 


While the makeup is just gorgeous the nails are my favourite feature of Kate Spade's beauty look this season.  Deborah Lippmann created these almond/stiletto shaped paws using three different colours and polish textures which she has described as "feminine but with an edge". Love. 


Images are not my own
Sources: Deborah Lippmann's Instagram account @deborahlippmann
Cult of Pretty tumbl and The Greyest Ghost wordpress